

Introduction
Concerned about your WooCommerce store security and loading speed, or simply want to tap into Woocommerce’s newly launched block editor? Those are the signs that you need to perform a WooCommerce update. And if you don’t know where to start yet, you’ve come to the right place.
In this tutorial, we will show you three simple steps on how to update WordPress WooCommerce:
Step #1: Set up Source Cart and Target Cart
Step #2: Configure the migration
Step #3: Perform data migration
What’s more? You will also get our preparation checklist and post-migration tips for a risk-free and error-free experience.
Let’s dive right in!
WooCommerce Update 101: What You Need To Know About
What is WooCommerce?
WooCommerce is an eCommerce WordPress plug-in built exclusively for WordPress websites. Simply put, you install the WooCommerce plug-in on your WordPress website to add products to your store, manage orders, accept customer payments, etc.
By nature, WooCommerce is an open-source platform– this allows it to give you more control over how your website works and looks.
WooCommerce is a robust open-source eCommerce platform for WordPress
What’s new in the latest version of WooCommerce?
In September 2023, WooCommerce made an exciting announcement through its changelog – WooCommerce 8.1. This latest version introduces several enhancements that are promised to bring about many positive impacts on your store.
From what we know, here are the four key features of WooCommerce changelog:
- Fresh WooCommerce Blocks Templates
- Introduction of new banner designs
- Additional settings for the Mini-Cart
- Expanded image size customization options for the Product Image block
WooCommerce update methods
 Just like any technological software for eCommerce, you should use the latest version of WordPress. This is because the WordPress and WooCommerce teams constantly improve their products by fixing bugs, introducing new features, etc. Just like any technological software for eCommerce, you should use the latest version of WordPress. This is because the WordPress and WooCommerce teams constantly improve their products by fixing bugs, introducing new features, etc. |
Upgrading your WooCommerce WordPress update plugin means upgrading numerous different parts of your online store, such as the database, theme, plugins, and payment methods.
Most of the time, these updates can be done with clicks. However, with manual updates, you will likely encounter various technical issues, like problems with older plugins or themes not working correctly with the new version. These could potentially mess up your store’s database.
Not to mention that updating WooCommerce manually can be a time-consuming task.
That’s why our advice is to choose a reliable automatic shopping cart migration service like LitExtension. With their automatic migration tool, you can update your WooCommerce store in hours without a glitch and have free support from their migration expert. (we will show you in more detail below)
What To Do Before WooCommerce Update?
Before doing a WooCommerce update, you should back up your current store database. This will be of great help in case your store’s crucial data gets damaged or even lost during the updating process.
Step #1. Backup the files of your online store
Firstly, you need to back up your WooCommerce website files via FTP.
- Open FileZilla or any FTP software > log in to your managed server.
- Navigate to Protocol, type in “Host”, “User” and “Password” then click “Connect”.

Login to your managed server for WooCommerce backups
- After a successful connection with your managed server, go to the folder where your WordPress is installed. Herein, you will access all the files your WordPress application uses.
- Pick these files you want to back up and click on them. Then, right-click on the selected files and choose “Download”.

Back up your WooCommerce website files
Afterward, it might take a few minutes to download all your selected files, depending on the size of your WooCommerce store.
Step #2. Backup database of your online store via phpMyAdmin
After you have backed up your WooCommerce website’s files, to proceed, you’ll need to finalize the backup process by backing up your store database via phpMyAdmin.
- To back up your WooCommerce site database, you need to know its name. And the database name is in the file “wp-config.php”, which belongs to the list of all the files of your WooCommerce site. Once you find it, right-click on the file and select the “View/Edit” to see the file’s code.
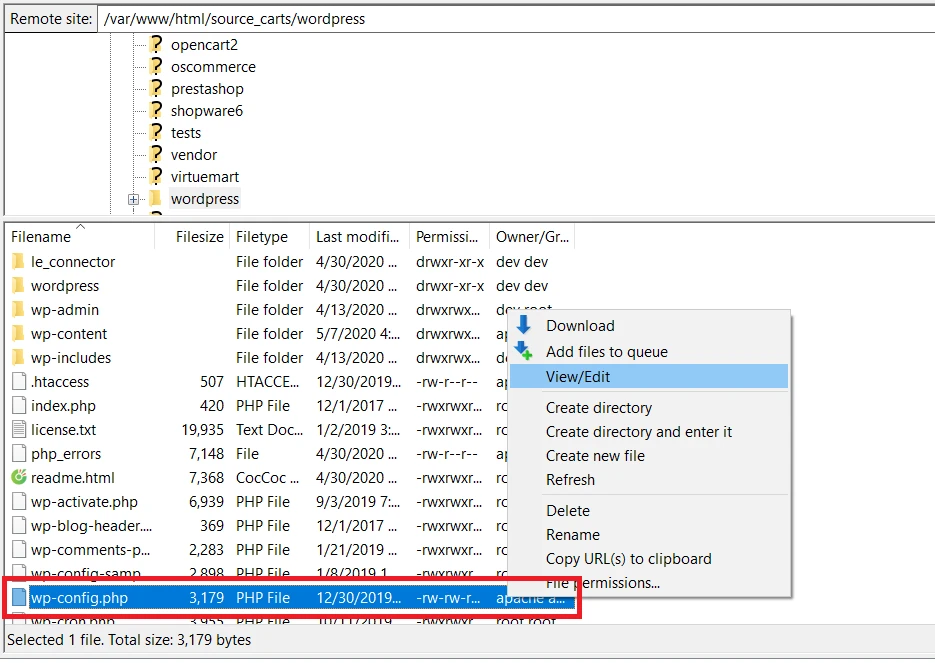
Click View/Edit
- Next, log in to phpMyAdmin.
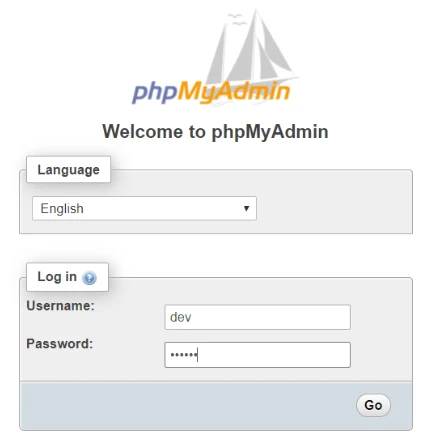
Log in to phpMyAdmin
- Search for the database name in the filter.
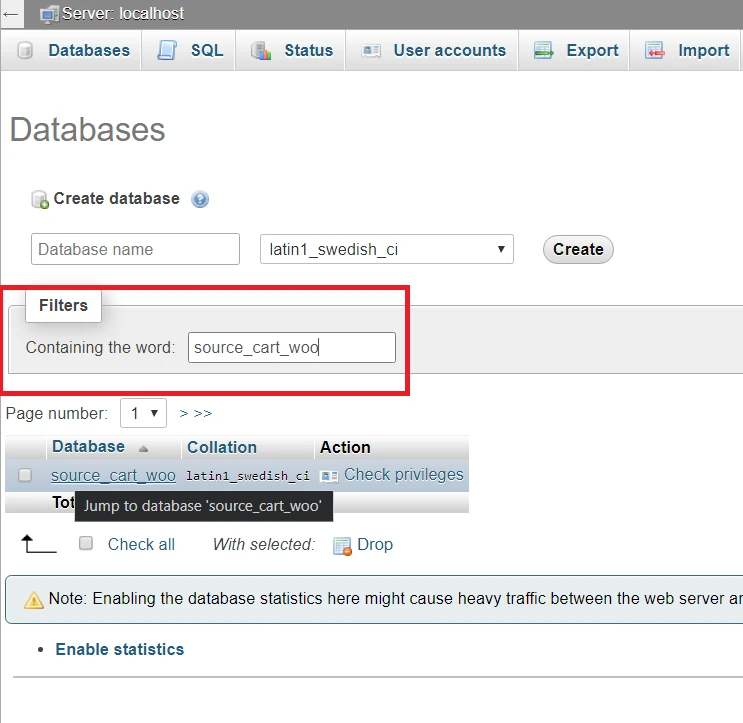
Search for your WooCommerce database name
- After you’ve found the database, click on it and you’ll be brought to the table view of the database > Click on the Export tab from the navigation panel.
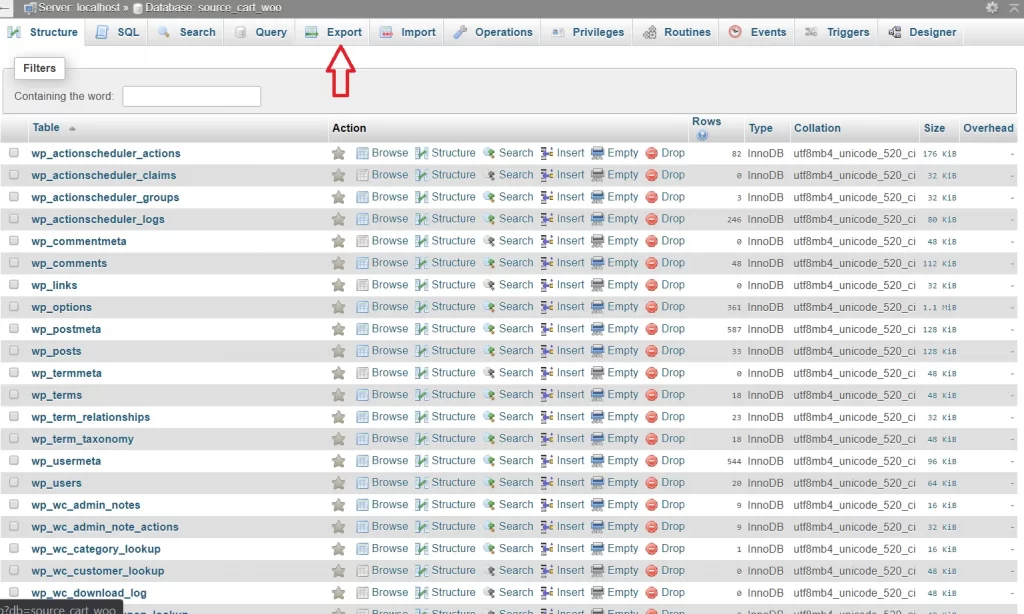
Click export on the navigation menu
- Click on the “Go” button to download the database file.
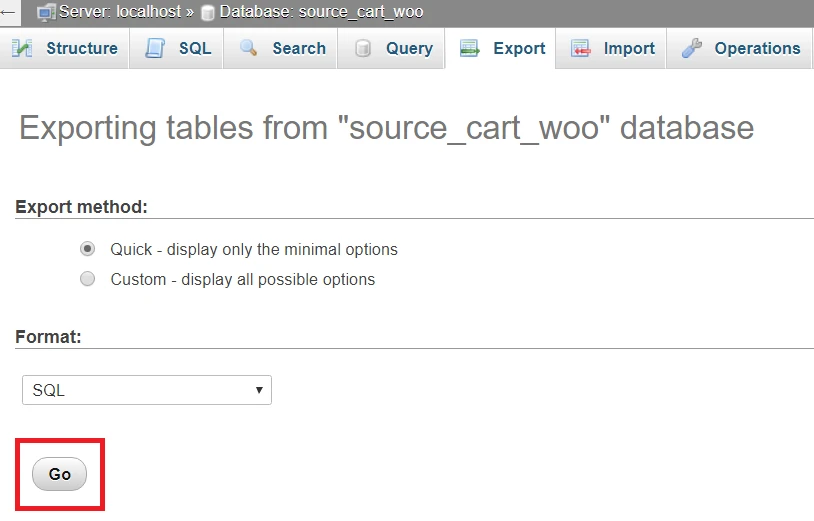
Click Go
How to Update WooCommerce Automatically?
After you have backed up your WooCommerce store’s data securely, let’s move on to the main part– update WooCommerce automatically with LitExtension’s automatic migration tool.
First, you need to sign up for a LitExtension account. Afterward, log in to your newly registered account, and click Create New Migration.
Step #1: Set up Source Cart and Target Cart
Choose WooCommerce as your Source Cart and fill in your WooCommerce store URL in the required field. Next, download the LitExtension Connector and install it with this guide.
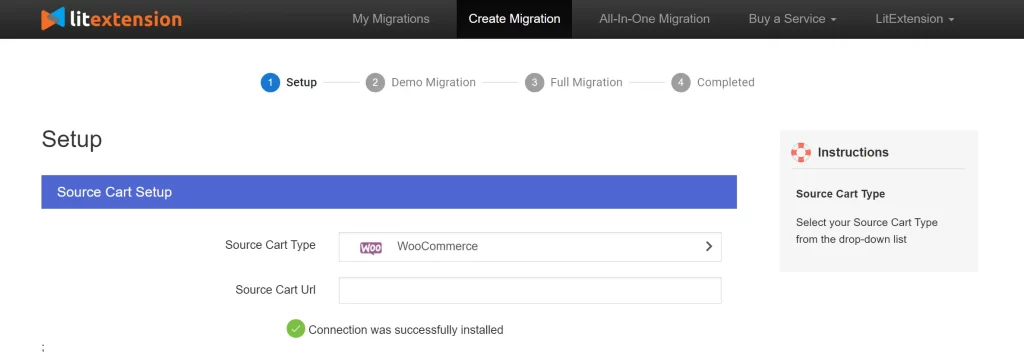
Choose Woocommerce as Source Cart
Once you have successfully installed the connector, a green mark “ Connection was successfully installed” will appear below the source cart URL.
Repeat the same steps to set up WooCommerce as your Target Cart store. Download the Connector, extract the zip file, and upload it to your WooCommerce target store’s root folder.
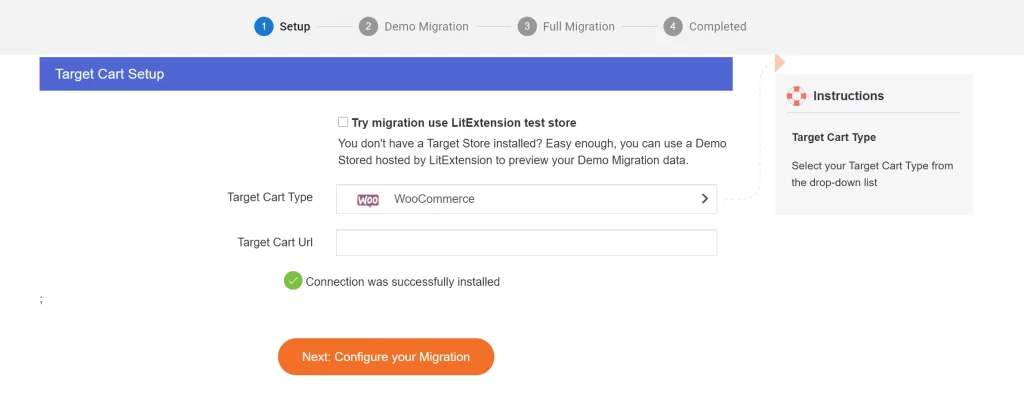
Choose Woocommerce as Target Cart
Step #2: Choose the entities you want to do in WooCommerce update
After you have set up the source cart and target cart, the next step is to choose the entities you want to update. With the LitExtension tool, you can update all your WooCommerce store’s crucial data like products, customers, blogs, coupons, etc., or only the entities you wish.

Choose the entities you want to update
What’s fantastic about LitExtension’s tool is that they have additional migration options to help elevate your migration tool. For example, here are the two options that merchants often pick when they update their WooCommerce store with LitExtension:
- Customer password migration to allow your customers to log in to their accounts without the hassle after the update.
- SEO migration to help you preserve product categories and URLs so your SEO effort won’t be negatively affected.
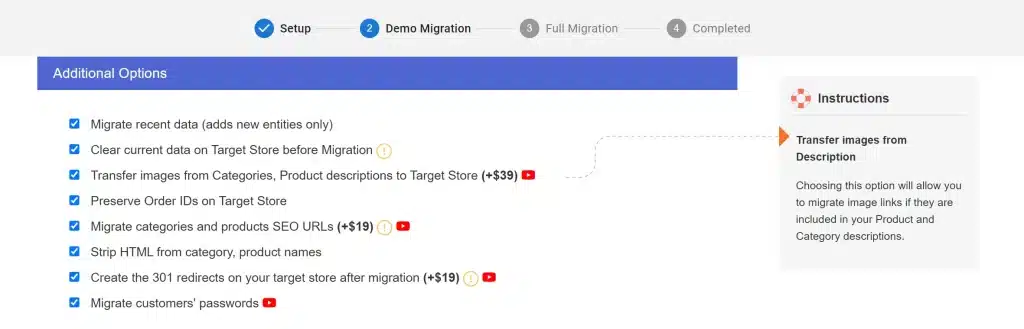
Additional migration options
Step #3: Perform WooCommerce update
Afterward, we highly advise you to try the free demo first to see how the LitExtension tool works. Otherwise, you can tick “Skip Demo migration” to start the full WooCommerce update right away.
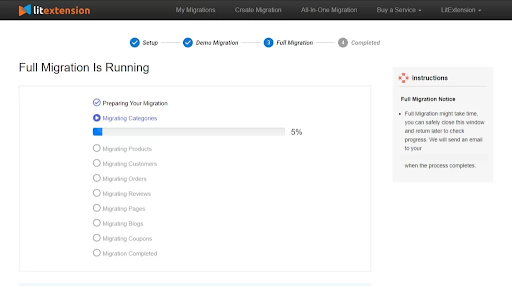
WooCommerce update running
After the migration is activated, it will run seamlessly on the LitExtension server. So you don’t have to keep your PC on.
Once the WooCommerce update has been completed, you’ll get a notification via email. And that’s how easy it is to do WooCommerce update with LitExtension.
WooCommerce Update’s Post-Checklist
Step #1. Migrate your recent data
If you have a ‘busy’ WooCommerce store, high chances are that your WooCommerce website still receives tons of recent orders from new customers during the update process.
Hence, after the update, we highly recommend that you leverage LitExtension’s Recent Data Migration service to transfer newly arising entities to your newly-updated WooCommerce store, ensuring no lagging data.
Step #2. Check results after migration
After you’ve finished updating all your WooCommerce data, remember to go to your new WooCommerce store and verify all your store entities are accurately and properly updated. This includes product information, customer, code, extensions, plug-ins, etc.
If you run into any issues, just contact LitExtension so they can assign a Customer Success Manager who will provide you with free 1-on-1 support.
Step #3. Test your WooCommerce store’s functionality
Before making your WooCommerce store live, do careful testing to ensure that your customers can browse your site comfortably and make it easily to the thank-you page after placing an order. From our experience, here are what you need to thoroughly test:
- Responsiveness: Ensure your WooCommerce store looks and works well on any device.
- Checkout process: Do some order tests to guarantee that your customers won’t get stuck at any point.
- Links and navigation: Double-check all links, buttons, etc., to ensure they direct customers to the right places.
How To Update WooCommerce Manually?
Before scrolling any further, please note that WooCommerce manual update is a rather complicated process that requires extensive technical know-how. That’s why we still suggest you save time by using LitExtension’s migration tool.
But if you are dead set on updating WooCommerce on your own, let’s go!
So if a new WooCommerce version is released, you’ll notice the “Update” button right next to the WooCommerce plugin on your WordPress admin dashboard.
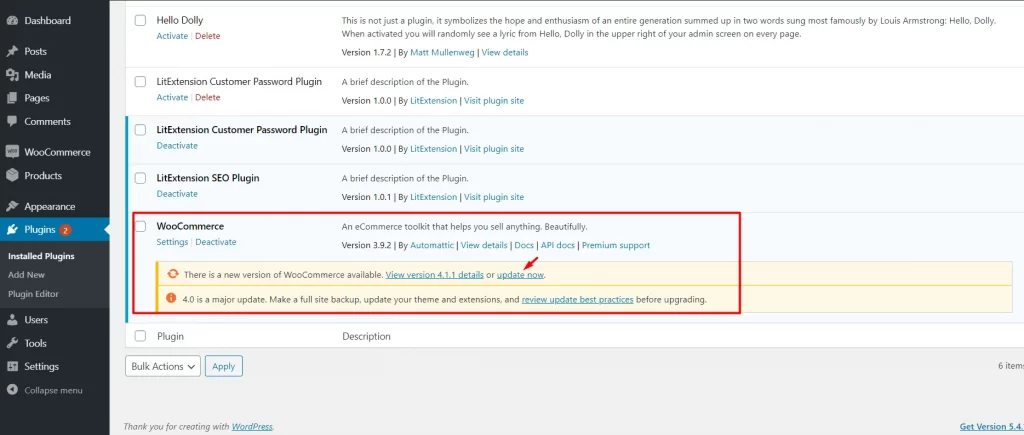
WooCommerce update button
But be alerted that you shouldn’t upgrade immediately as it can potentially pose compatibility threats to your store. Hence, to avoid jeopardizing your store, ensure you test the upgrades on the staging site first and then upgrade on the live site.
Step #1: Set up a staging site
There are three methods to set up your WooCommerce staging site:
- Use your hosting provider: Some hosting providers, like Bluehost or SiteGround, offer staging environments. However, this extra option usually comes with a higher plan fee.
- Use a plugin: You can use leverage WordPress plugins like WP Staging Pro or All-in-one WP migration to set up a WooCommerce staging environment.
- Set up a staging site manually
If you don’t want to pay extra cash for your hosting provider or third-party plug-in, below is how to create a manual staging site for your WooCommerce store:
- Log in to your cPanel and select the Subdomains option
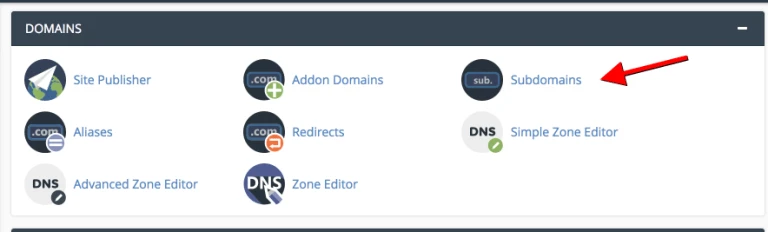
Subdomain option in cPanel
- Type in your Subdomain name
Note: You must not include the exact address of the main domain in your staging subdomain. Otherwise, it will end up being a directory inside your live store.
- Click Create to generate a subdomain
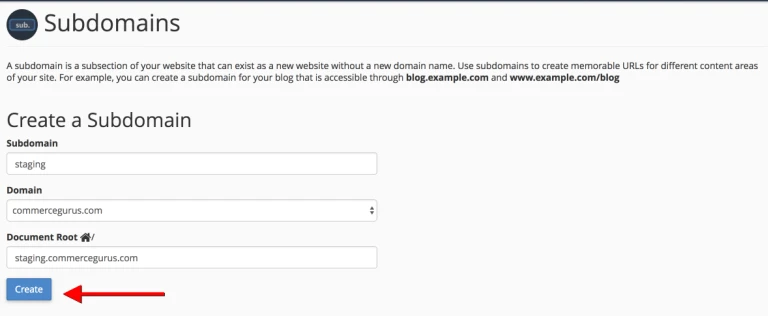
Create a subdomain for your staging site
Once you’ve set up your staging site, you can access and interact with it exactly how you do with your live store.
Step #2: Update the staging site
Afterward, it’s essential to perform data updates on your staging site. Keep in mind that themes, payment methods, and plugins sourced from third-party developers cannot be updated through the usual process. For compatibility and support regarding updates, you should reach out to the respective third-party developers.
#1. Update theme
The primary steps for manually upgrading your theme are as follows:
- Sign in to your WooCommerce.com account and download the latest version of your theme.
- Extract the contents, rename the folder, and then compress it back into a ZIP file. It’s crucial to change the folder’s name to avoid errors, as there may already be a theme folder on your server with the same name as the one in your ZIP file.
- Within your website, navigate to Appearance > Themes > Add New.
- Select the Upload option to upload the newly renamed ZIP file.
- Visit Appearance > Themes and click on Activate.
If you’ve made customizations to your old theme, you’ll need to reapply these modifications to the new one later.
#2. Update payment methods
WordPress provides the flexibility to adjust, include, deactivate, or refresh payment options for your WooCommerce shop. To make changes to your existing payment gateways, follow these steps:
- Navigate to WooCommerce > Settings in the WordPress menu column.
- Select the Payment tab at the top of the page, which displays a list of available payment methods.
- To modify your payment methods, click the Manage button in the right-hand column.
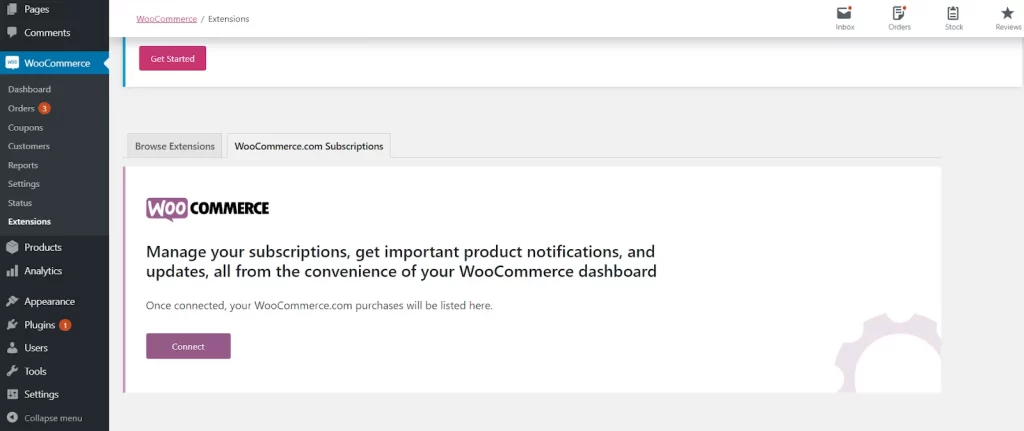
#3. Update plugins
On the WooCommerce admin dashboard, navigate to Extensions > WooCommerce.com Subscriptions.
WooCommerce.com Subscriptions
Here, you should link your WooCommerce.com account to your WooCommerce store by logging in to your WordPress account and granting permission for the connection.
Following that, you will be redirected to your WooCommerce.com Subscription tab, where your account will be automatically linked. Subsequently, you will find a list of products you’ve acquired from WooCommerce.com.
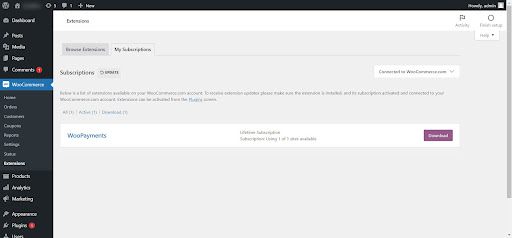
WooCommerce.com Subscription tab
At this point, you can manage your extensions by selecting from the following choices: activate, renew, or update. If a new version is accessible, you will receive an update notice alongside an update button for each extension.
Upon clicking this button, you will be directed to the next update page. Here, you can update all extensions with new releases available by clicking “Select All.”
#4. Update database
The database is responsible for storing your products, orders, posts, and pages. Updating the WooCommerce database on the staging site involves two main steps:
- Firstly, you need to create a new database.
- Secondly, you must upload the previously saved database into the newly created one.
#1. Backup database
To transfer your live site’s database to the staging site, you should start by exporting your database into a file. Additionally, creating a backup ensures that you can revert to the previous version if the upgrade encounters any issues.
Creating a database backup is a quick process. Simply go to Tools > Export to export your site contents, encompassing pages, products, variations, orders, refunds, coupons, and media, all saved in an XML file.
#2. Upload database to staging site
To upload the database backup to the staging site, you’ll need to utilize FileZilla, a free software for transferring files over the internet. After downloading and setting up FileZilla, open it and provide your credentials. Then, establish a connection.
Navigate to Remote site > public_html > staging. You’ll notice that the backup folder you downloaded is displayed on your local computer. Select it, right-click, and choose Upload. Now your backup folder is within your staging folder.
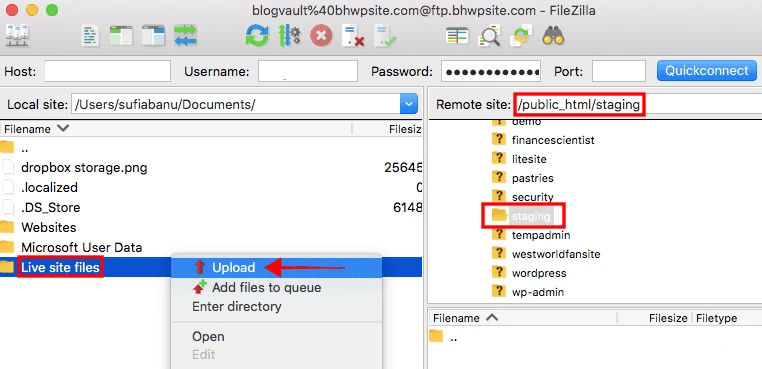
Upload the WordPress files into the newly created one
#3. Create a new database for your staging site
Next, you need to create a new database for the staging site. Log in to your hosting account and find Databases > MySQL Databases > Create New Database.
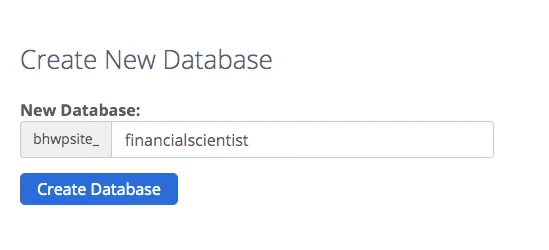
Create a new database
Next, create a MySQL user for this database by scrolling down on the same page and setting up a new user.
Now, you should upload the previously saved database into this fresh database. Access phpMyAdmin through the hosting dashboard to complete this step.
Select the newly created database, then click the “Import” option to ensure you’re importing the correct database. Proceed to import the database from your computer.
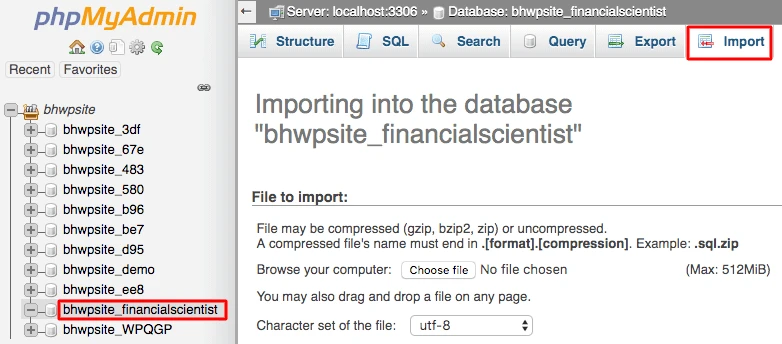
Choose a recently established database and hit the “Import” button
In this step, you’ll need to adjust the wp-config file to establish a connection between the database and the staging site.
Using FileZilla, navigate to Remote site > public_html > staging > wp-config.php. Right-click on the file and choose Edit. Inside the file, you’ll find information about your previous database (or your live site’s database). Replace this information with the details of the new database name, username, and password.
After making these changes, don’t forget to save the file.
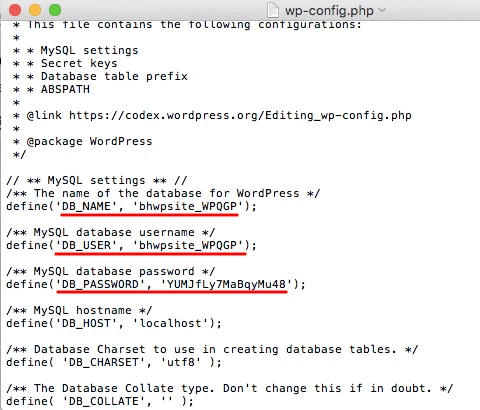 Adjust the wp-config file
The website’s URL will be displayed as follows: staging.yourwebsitename.com. You can use the same login credentials as those on your live website.
Step #3: Test your staging site
The next step is testing the updated data on your staging site to ensure compatibility. In addition to compatibility, it’s imperative to examine other aspects, such as loading speed, stability, and responsiveness.
To achieve this, it is essential to assess both the back-end and front-end of your store.
#1. Check store back-end
- Confirm the absence of any remaining outdated items in your back-end.
- Test the updating of personal information.
- Experiment with adding and removing products in your store.
#2. Check store front-end
- Explore essential pages, including category pages, individual category pages, single product pages, etc.
- Verify the functionality of the search system.
- Attempt to make a purchase.
- Conduct searches for specific products, orders, and customers.
- Evaluate the effectiveness of your WooCommerce checkout process.
Step #4: Push the site to live
Before deploying the staging site, it’s necessary to switch your live store to maintenance mode. While this may result in temporary store downtime, it ensures no new orders are missed during this phase. Once completed, don’t forget to disable maintenance mode.
And that’s how to manually update your Woocommerce store.
WooCommerce Update – FAQs
How to update WooCommerce manually?
To update to the WooCommerce current version, follow these five steps:
- Download the latest version of WooCommerce from the WordPress.org plugin directory.
- Deactivate and delete the WooCommerce plugin from your WordPress site.
- Upload the new WooCommerce plugin zip file to your WordPress site and install it.
- Activate the WooCommerce plugin.
- Update the WooCommerce database.
How often does WooCommerce update?
WooCommerce releases new updates on a regular basis, typically every few weeks. If you want to get yourself updated, you can check out the official WooCommerce news.
Should I update WordPress or WooCommerce first?
It is generally recommended to update WordPress before updating WooCommerce. This is because WooCommerce is a WordPress plugin.
Hence, updating WordPress first can help to ensure that WooCommerce is compatible with the latest WordPress version when you upgrade WooCommerce.
What is my WooCommerce version?
To check your WooCommerce version, go to Dashboard > Plugins in your WordPress admin panel. The WooCommerce version you are using will be listed below the plugin name.
Final Thoughts On WooCommerce Update
All in all, if you want to improve your WooCommerce store’s security and performance, and tap into the latest WooCommerce features, make sure you do WooCommerce update. And we hope after reading this article, you will know how to do WooCommerce updates properly whichever method you choose.
Interesting Related Article: “Composable Commerce: The Future Of eCommerce“
from Technology Articles - Market Business News https://ift.tt/hbgJNYK
via IFTTT


0 Comments